The Ultimate Dutch Oven Artisan Bread Recipe (Crispy Crust & Soft Inside)
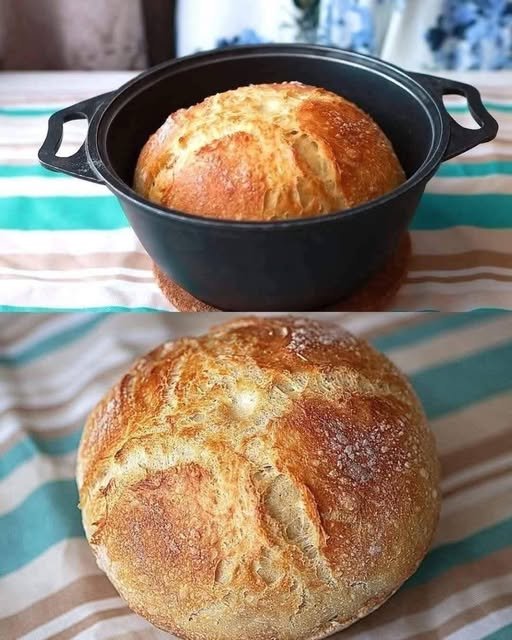
There is something magical about pulling a perfectly golden loaf of homemade bread from the oven. The crackling crust, the soft and airy crumb, and the comforting aroma filling your kitchen make baking bread one of the most rewarding experiences. The beautiful loaf in the image above is a classic Dutch oven artisan bread with a rustic crust and tender interior. The best part? You don’t need fancy equipment or professional baking skills to make it.
This easy no-knead artisan bread recipe requires only a handful of pantry ingredients and minimal effort. With a little patience during the rising process, you’ll create bakery-quality bread that is perfect for sandwiches, soups, toast, or simply enjoying with butter.
Whether you’re a beginner baker or an experienced home cook, this recipe delivers consistent, delicious results every single time.
Why You’ll Love This Recipe
- Crispy, bakery-style crust
- Soft, fluffy, chewy interior
- No bread machine required
- Minimal kneading
- Only 4 simple ingredients
- Perfect for beginners
- Great for meal prep
- Freezer-friendly
Ingredients
- 3 cups (375g) bread flour (or all-purpose flour)
- 1½ teaspoons salt
- 1 teaspoon instant yeast
- 1½ cups (360ml) warm water
Optional
- 1 tablespoon olive oil
- Extra flour for dusting
- Cornmeal or parchment paper
Equipment Needed
- Dutch oven with lid
- Large mixing bowl
- Wooden spoon
- Kitchen towel or plastic wrap
- Parchment paper
- Cooling rack
Step-by-Step Instructions
Step 1: Mix the Dough
In a large bowl, combine the flour, salt, and instant yeast.
Pour in the warm water and stir using a wooden spoon until all the flour is incorporated. The dough will be sticky and shaggy, which is exactly how it should look.
There is no need to knead the dough.
Step 2: First Rise
Cover the bowl with plastic wrap or a clean kitchen towel.
Let the dough rise at room temperature for 12–18 hours.
The dough should double in size and become bubbly.
Slow fermentation creates incredible flavor and gives the bread its signature artisan texture.
Step 3: Shape the Dough
Lightly flour your work surface.
Gently scrape the dough onto the counter.
Fold the edges toward the center several times to create surface tension.
Shape into a round loaf.
Avoid pressing out all the air bubbles.
Place the dough on parchment paper and cover with a towel.
Let it rest for 30–45 minutes.
Step 4: Preheat the Dutch Oven
About 30 minutes before baking, place your Dutch oven with the lid inside the oven.
Preheat to 450°F (230°C).
A hot Dutch oven creates steam that produces the beautiful crispy crust.
Step 5: Bake
Carefully remove the hot Dutch oven.
Lift the parchment paper with the dough and place it inside.
Cover with the lid.
Bake for 30 minutes.
Remove the lid.
Continue baking for another 12–15 minutes until the crust becomes deep golden brown.
The internal temperature should reach about 205–210°F (96–99°C).
Step 6: Cool
Transfer the bread to a cooling rack.
Allow it to cool for at least one hour before slicing.
Although it’s tempting to cut into it immediately, cooling allows the crumb to finish setting.
Baking Tips for Perfect Bread
- Use bread flour for a chewier texture.
- Don’t rush the overnight rise.
- Keep the dough sticky—avoid adding too much flour.
- Always preheat the Dutch oven.
- Bake with the lid on first to trap steam.
- Cool completely before slicing.
Variations
Rosemary Garlic Bread
Mix in:
- 2 teaspoons chopped rosemary
- 3 minced garlic cloves
Cheese Bread
Add:
- 1 cup shredded cheddar
- 2 tablespoons Parmesan
Whole Wheat Version
Replace half of the bread flour with whole wheat flour.
Seeded Bread
Top with:
- Sesame seeds
- Pumpkin seeds
- Sunflower seeds
- Flax seeds
Serving Ideas
This artisan bread pairs beautifully with:
- Butter and jam
- Olive oil and balsamic vinegar
- Homemade soup
- Pasta dishes
- Grilled cheese sandwiches
- Avocado toast
- Bruschetta
- Breakfast eggs
Storage Instructions
Store the bread in a paper bag or bread box at room temperature for up to 3 days.
Avoid refrigerating, as it can dry out the loaf.
To freeze, wrap the cooled bread tightly in plastic wrap and foil. Freeze for up to 3 months. Thaw at room temperature and refresh in a 350°F (175°C) oven for 10 minutes before serving.
Frequently Asked Questions
Can I use all-purpose flour?
Yes. Bread flour gives a chewier crumb, but all-purpose flour works very well.
Why is my bread dense?
Common reasons include under-proofing, expired yeast, or adding too much flour.
Do I really need a Dutch oven?
A Dutch oven produces the best crust because it traps steam, but you can also bake on a baking stone with a pan of hot water in the oven.
Can I add herbs or cheese?
Absolutely! Fresh herbs, roasted garlic, olives, shredded cheese, and dried tomatoes are excellent additions.
Can I freeze the dough?
Yes. After the first rise, shape the dough, wrap tightly, and freeze. Thaw overnight in the refrigerator before baking.
Final Thoughts
Homemade artisan bread is one of the easiest and most satisfying recipes you can make. With just four basic ingredients, a Dutch oven, and a little patience, you’ll achieve a loaf with a beautifully crisp crust, a soft and airy interior, and incredible homemade flavor that rivals any bakery. This no-knead recipe is ideal for beginners yet impressive enough to serve at family dinners or special gatherings.
Once you’ve mastered this classic loaf, don’t be afraid to experiment with herbs, cheese, seeds, or whole grains to create your own signature bread. Fresh from the oven and enjoyed with a pat of butter or alongside your favorite soup, this rustic artisan bread is proof that simple ingredients can create something truly extraordinary. Happy baking!